Where two or more visuals, slicers, shapes, images, buttons, or dynamic assets are selected on the canvas, they can be "grouped" and the group can then be rotated, re-sized, aligned, moved, copied, cut, or pasted as if it were a single item. You can also change the shared attributes of some items in the group. Grouping is useful when you want to apply the same formatting changes to a number of items or where you have items that should always go together, such as an info icon and the info text that it relates to, or a visual and a text box containing its title.
You can ungroup a group of items at any time and then regroup them later.
Although grouping allows users to move or format items together, there are also some options you can apply to items independently of their group without having to ungroup them.
Tip: The Group option is only available on the right-click context menu where two or more items are selected on the canvas.
Grouping and ungrouping
Group items
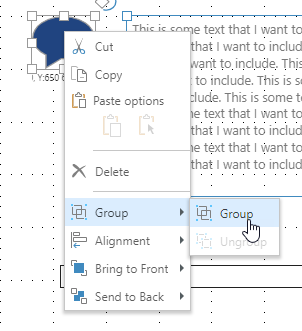
- Select the items that you want to group.
- Right-click Group > Group.
Click to select the first item, then Ctrl+click to select each subsequent item. Alternatively, drag your cursor while holding your mouse button to select multiple items in a particular area of the canvas.
The items are now grouped. Notice that selecting the group now draws the selection border around the outside of the grouped items.
Tip: You can add additional items to an existing group by selecting the group and the new item and right-clicking Group > Group.
Ungroup items
You can ungroup the items on your canvas to return to changing and moving the items independently:
- Select the group.
- Right-click Group > Ungroup.
The individual items are now no longer part of a group.
Edit group
Edit individual items in the group
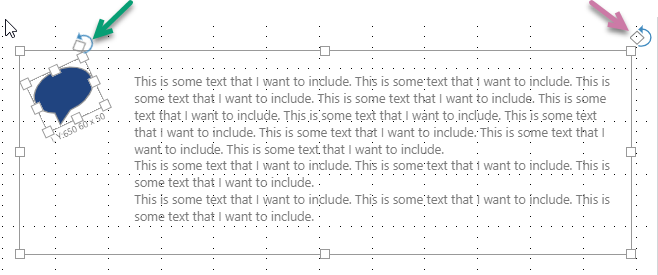
Even though the items are grouped, there are some functions that can be performed on the individual items within the group:
- The content of a text box can be edited by double-clicking the content and making your changes directly.
- Items can be re-sized using the "grab" handles. Select the item within the group and then manually resize.
- Items can also be rotated using the rotation handle on either the group (purple arrow) or the selected item inside the group (green arrow).
Editing all items in the group
Once items are grouped, you can use the standard editing options on the right-click menu against the group rather than the item and, where the group contains items of the same type (multiple shapes or multiple text boxes, for example), you can make changes to all items at once using the options on the ribbon. You can also interact with the group directly; dragging, rotating, re-sizing, and so on; as if the group were a single item.